How to Create a Stunning Stained Glass Lighthouse Night Light
Table of Contents
Introduction
Creating a stained glass lighthouse night light is a delightful project that combines artistry and functionality. This guide provides step-by-step instructions to help you craft a stunning decorative piece. Whether you’re a beginner or an experienced crafter, this stained glass lighthouse will make a modern and charming addition to your desk or table.
Before we begin
This pattern from our studio stands out from our previous 3D designs. Although it looks simpler, creating it turned out to be more challenging than assembling houses. This is because the lighthouse has a hexagonal shape, and each side must be cut as precisely as possible according to the pattern; otherwise, assembling the lighthouse will not be successful.
You can find the lighthouse pattern here.
1. Materials and Preparation
Before you begin, ensure you have the following materials:
- Stained glass lighthouse pattern (available as printable PDF and SVG files)
- Stained glass sheets in your preferred colours
- Yellow cabochons (optional, for windows)
- Copper foil tape
- Soldering tools
- Ruler or straight edges
- Hexagonal template
- Wire for embellishments
Key Tips:
- Print your pattern on A4 or Letter-sized paper.
- Cut all the pieces accurately, as precise edges are crucial for assembling the lighthouse.
- Arrange your glass pieces vertically to visualize the assembly.
- If you have a cricut, then we have prepared 2 svg files for you (both files are needed to make stained glass lighthouse night light)


2. Cutting and Fitting the Glass
Once your materials are ready, follow these steps:
- Carefully cut each piece of stained glass to match the pattern.
- Use a “conductor” — two straight edges or trimmed glass sheets — to align the pieces accurately.
- File the edges to ensure all pieces fit together seamlessly.


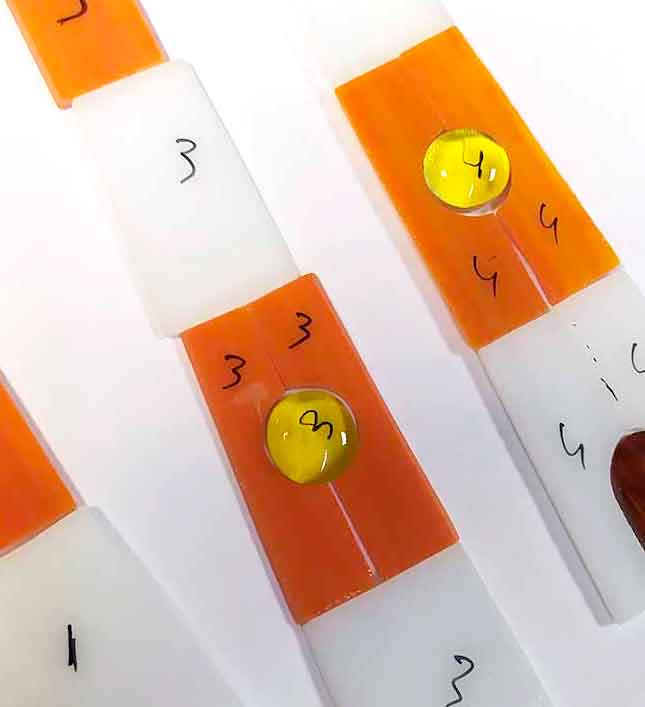
Window Details:
For added charm, use yellow cabochons for the windows. These rounded pieces create a beautiful glow when illuminated and add an original touch to your lighthouse.
3. Foiling the Pieces
Wrap each glass piece with copper foil tape:
- Ensure the foil is evenly applied with identical edges on both sides.
- Press the foil firmly to prevent peeling.
After foiling, recheck the fit of all pieces to confirm their alignment.
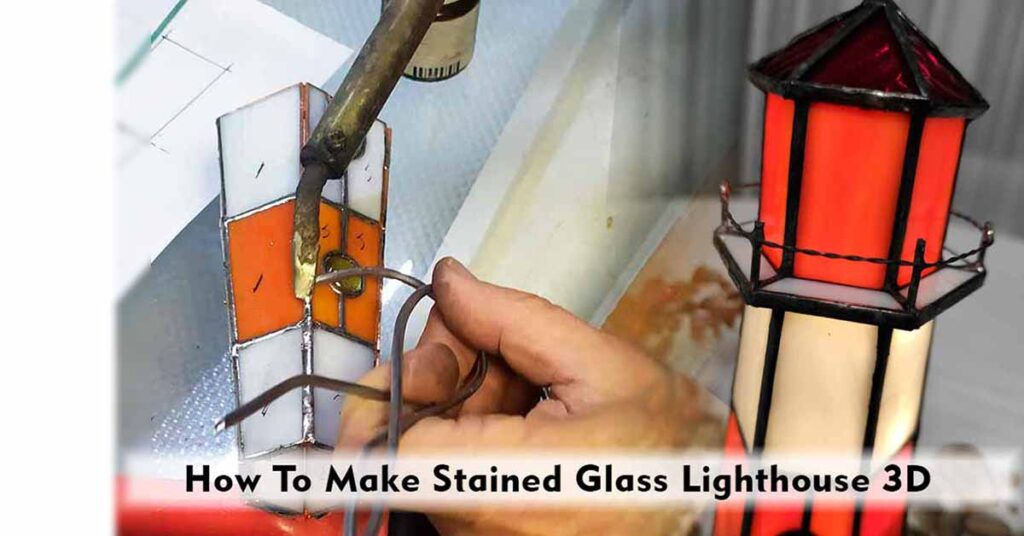
4. Assembling the Lighthouse
Constructing the Body
- Begin by soldering the six panels of the lighthouse’s body. Use a hexagonal template from the stained glass lighthouse pattern to achieve accurate angles.
- Attach only one drop of solder at the top and bottom to hold the panels in place temporarily.
- Leave out the fourth top piece for now, as the tower is assembled separately.
- Make 2 halves of the body with three panels each and then join them together.


I want to point out that we didn’t think about the windows in the tower, but now, looking at the finished lighthouse, I would make another detail out of transparent yellow glass so that the lighthouse tower would have windows through which light passes. Or you can make all the windows of the lighthouse out of transparent glass.
Building the Tower and Roof
- Cut and assemble the tower pieces according to your pattern.
- Solder the tower panels into a hexagonal shape.
- Construct the roof without filing edges at a 45-degree angle. The roof should fit naturally onto the lighthouse body.


Final Soldering:
Once all parts fit perfectly:
- Fully solder the lighthouse body, tower, and roof.
- Strengthen the seams from both inside and outside for durability.


5. Adding Decorative Elements
Enhance your lighthouse with additional details:
2:35 Making a fence for the lighthouse observation deck
- Balcony Railings: Bend a thin wire to create a charming railing around the tower’s balcony.
- Patina Finish: Apply patina to the soldered seams for a polished look.


6. Final Assembly and Cleaning
After assembling the lighthouse:
- Clean it thoroughly to remove any flux residue.
- Test the fit of all parts and make final adjustments if necessary.
- Add a small LED light inside to transform your lighthouse into a functional night lamp.


Conclusion
Your stained glass lighthouse night light is now complete! This small yet captivating piece makes a stylish addition to any desk or table, bringing a touch of coastal charm to your home. Whether used as a decorative item or a functional nightlight, your handcrafted lighthouse is sure to impress.


Why Make Your Own?
Crafting a stained glass lighthouse offers not just a creative outlet but also a sense of accomplishment. Each piece is unique, reflecting your style and effort. Dive into this rewarding project and bring your vision to life!
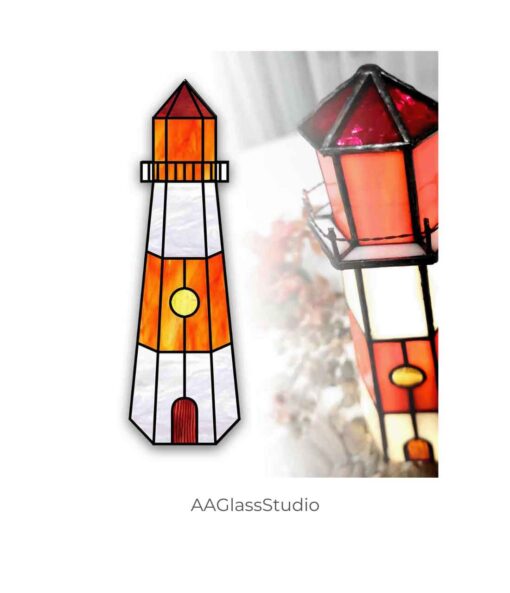
3d Stained Glass Lighthouse Pattern Night Light
Digital product, PDF files, Commercial license Height 8.2″ Width 1.37″ 43 piece of glass