


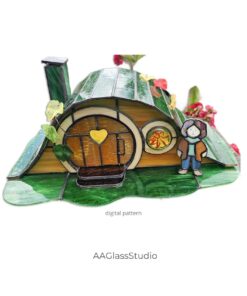


Whimsical Hobbit House Stained Glass Pattern – 3D Light
$16.50
Digital product, printable PDF & SVG, Commercial license
overall dimensions
h = 3.94″” (100 mm)
w = 11.03″” (280 mm)
53 piece of glass
Or search Facebook using this hashtag: #HobbitHouse211111
Frequently Asked Questions
Have questions?
What size the svg file should print to?
Description
Hobbit House Stained Glass Pattern — 3D Light Box with Round Turret
This Hobbit House stained glass pattern is a 3D project rather than a flat window hanging: an English cottage built around a round turret with a conical roof and a central chimney, drawn so it assembles into a lit box. Put a warm light inside and the lead lines throw shadows across the walls and ceiling, which is where the charm of this kind of piece comes from. It is a fun build, and a gift that people notice.
Overall the house measures 3.94″ tall × 11.03″ wide (100 × 280 mm) and uses 53 pieces of glass. The pattern is marked as an ordinary difficulty project with an intricate outline — the individual shapes are workable, but assembling the walls and getting the roof sections to meet cleanly takes care. Allow a few evenings.
What is in the download
- House PDF — the full pattern with all assembly pieces
- All files folder — every file in one place
Your download link appears on the order page and in the confirmation email as soon as payment clears.
What you need beyond the download
This pattern assumes you already cut and assembled at least one stained glass piece. You will want a small light source for the finished box — an LED candle works well and avoids heat near the solder — plus a backing board and something to stand the house on. None of that is included in the download.
Who buys this pattern
Hobbyists who enjoy fantasy and storybook décor; makers building a run of seasonal windows; anyone who wants a lit 3D piece rather than another flat panel; and people looking for a handmade gift that does not look handmade in a disappointing way.
Licence
A personal and commercial licence is included. Make it for yourself, make it as gifts, or build and sell finished houses — no additional fees.
Printing and finishing
Print the PDF at 100% scale on US Letter or A4 and check measurements before cutting. Because this is a 3D assembly, keep the pieces in order as you cut them and label the faces — once the walls are soldered you lose easy access to the interior edges. Drill a small hole for the light wire before the final solder, not after.
Find more designs on Facebook
Search Facebook using the hashtag #HobbitHouse211111 to see finished versions and new releases in this series.
A note before you start
You are buying the pattern only. Glass, came, solder, the light source, the backing board and any finished piece are not included. The photographs show completed houses made by other customers from this same pattern.
Reviews (1)
1 review for Whimsical Hobbit House Stained Glass Pattern – 3D Light
Add a review
Related products


Wesley (verified owner) –
This was a fun project to do. The instructions and patterns were clear and complete. Didn’t like the idea of soldering the house to the base enclosing the lighting inside. Made a set of 14mm wide clips out of zinc u-came, and soldered those to the base. House looks great when lit up. Will be ordering and trying some of the other 3D projects.